Blog Archives

15 Easy One-Pot Recipes for Date Night
 Work. Meetings. Appointments. Playing Taxi Cab. Taking the kids to soccer practice. Helping with Homework. Choir Practice. The list just goes on and on. And after all that who has time for some quiet alone time with your spouse or significant other? Let alone stand over a hot stove and cook a gourmet meal. But don’t fret; Sunshine is here to save the day or night in this case. I’ve discovered 15 Easy One-Pot Recipes that you can re-create together for a special date night in. So light some candles, turn on some slow jams and open up a bottle of your favorite wine. It’s time to unplug and connect with some good food & adult conversation!
![]() XO, Sunshine
XO, Sunshine
1. Baked Chicken with Tomatoes & Garlic: Get the recipe on Brooklyn Supper
2. Skillet Chicken & Zucchini Parmesan: Get the recipe on Simple Bites
3. Potato, Kale & White Bean Hash: Get the recipe on Beard & Bonnet
4. Creamy Baked Millet w/ Butternut Squash: Get the recipe on Autumn Makes And Does
5. Barbeque Shrimp – New Orleans Style: Get the recipe on Wonky Wonderful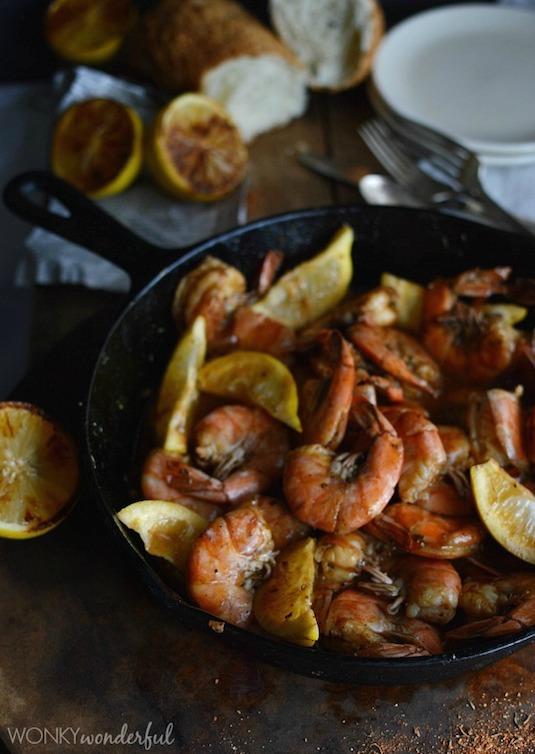
6. Mushroom Skillet Lasagna: Get the recipe on Savory Simple
7. Crispy Chicken Legs and Brussels Sprouts: Get the recipe on So Let’s Hang Out!
8. Saffron Shakshouka: Get the recipe on Brooklyn Supper
9. Spicy roast chicken with Carrots, Olives & Lemon: Get the recipe on The Crumb Blog
10. Slow Cooker Tuscan Tortellini Soup: Get 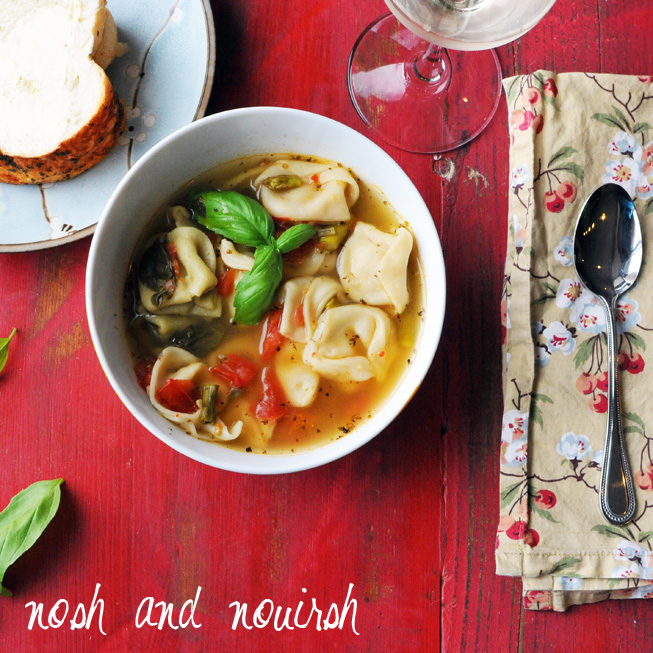 the recipe on Nosh & Nourish
11. Sriracha Lime Chicken Skillet: Get the recipe on Running To The Kitchen
12. Chicken & Eggplant Sauté: Get the recipe on Lexi’s Clean Kitchen
13. Skillet Spaghetti: Get the recipe on Julie’s Eats & Treats
14. Thai Basil Cashew Chicken Skillet: Get the recipe on Running To The Kitchen
15. Saucy Chicken: Get the recipe on Diethood
Photo Credits: Simple Bites, Wonky Wonderful & Nosh and Nourish

OMG! Hummus Wrap
 Just when I thought there was only one way to eat hummus … Pioneer Woman goes and do this!!! Hummus Wrap! I’m like OMG! WHAT?!?!? And to top it all off it is loaded with some of my faves … Artichokes, Feta Cheese, Roasted Red Peppers, Grilled Onions … Need I say more! Ummm. Is it lunch time yet? #HUNGRY
INGREDIENTS
- 1 Tablespoon Butter Or Olive Oil
- 1/2 whole Red Onion, Halved And Sliced
- 1 whole Spinach Flour or Favorite Tortilla (large)
- 1/4 cup Hummus (Homemade Or Store Bought) – By All Means Add More If Needed
- 1 whole Roasted Red Pepper, Sliced
- 3 whole Artichoke Hearts, Halved
- 2 cups Mixed Greens
- 1 Tablespoon Your Favorite Balsamic Vinaigrette (Homemade Or Store Bought)
- 1/4 cup Feta Cheese Crumbles
Preparations Instructions
- Melt the butter in a skillet over medium-low heat. Add the red onions and cook slowly for 10-15 minutes, stirring occasionally, until soft and deep golden brown. Set aside and let them cool slightly.
- Grill the tortilla on a grill pan over medium heat for 1 minute, just until it has grill marks on the outside. (If you don’t have a grill pan, just use a skillet.) The tortilla should still be soft and pliable; just with a little bit of color! Let the tortilla cool slightly.
- To assemble the wrap, spread the hummus down the middle third of the tortilla. Arrange the cooked onion slices and the sliced roasted red peppers all over the hummus. Add the artichoke heart halves. Toss the salad greens in the balsamic dressing, then lay them on the wrap. Finally, sprinkle the crumbled feta all over the greens.
- Carefully wrap up the tortilla, tucking in the ends. Slice the wrap down the middle, share with a friend or NOT!
Credit of Recipe & Photo is courtesy of The Pioneer Woman
 XO, Sunshine

Change Your Life With Chia
When you hear “chia,” you may think of “Chia Pets.” These are clay figures sold in the US that support the growth of chia sprouts. But chia has a much longer history as a medicinal herb. It originated in Mexico and was cultivated by the Aztecs. Supposedly, the Aztecs, Mayans, and Incans used chia as a staple of their diet and as an energy food. Chia means “strength” in the Mayan language, and they were known as the “Indian Running Food” because runners and warriors would use them for sustenance while running long distances or during battle.
The chia seeds are “super” because, like a superfruit, they deliver the maximum amount of nutrients with minimum calories. They have several of the same benefits as the more well-known “super seed” flax, but unlike flax seed, you don’t need to grind them to reap the health benefits. The nutritional benefits of chia include fiber, omega fatty acids, calcium, antioxidants and much more – even protein!
Not only are chia seeds gluten and grain free naturally, but one tablespoon of this SUPER SEED has more calcium than a glass of milk, more Omega-3s than Salmon and more antioxidants than blueberries. Who Knew? Lord knows I didn’t!
Anywho, Chia seeds are super high in soluble fiber which, in addition to filling you up, has cholesterol-lowering properties and prevents the absorption of fat. GIVE ME SOME NOW!!!! LOL Whether it be for breakfast, lunch, dinner or a simple mid-day snack, chia seeds are very easy to incorporate into your everyday diet. Try eating them raw. Or Try stirring two tablespoons of “whole” or “raw” chia seeds into a glass of water or fruit juice. Wait a few minutes, drinking them down before the seeds absorb the liquid and get hard. They are also perfect in oatmeal and puddings and they make an ideal addition to baked goods including breads, cakes and biscuits.
So go ahead and try a healthy “Cha-Cha-Cha-Chia” recipe today. It will help you curb those mid-day cravings!

DIY Monday: Homemade Chocolate Frosty
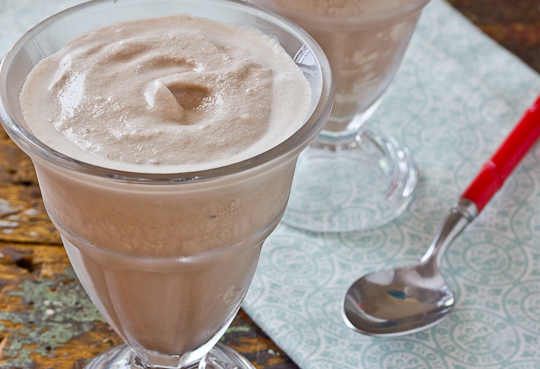
Question: Have you ever had a frosty from Wendy’s?
If you answered yes then you know that on a HOT summer day there is nothing better than this chocolaty treat. It’s Rich, Creamy and Oh So Dreamy! So when I ran across this copy cat recipe I was like, SCORE! So go ahead, INDULGE a little! It’s inexpensive, delicious, and you will score “The Coolest Mom EVER!” points! Besides you deserve it.
P.S. Don’t let the summer pass you by without giving this recipe a try.
INGREDIENTS
- 2 cups whole milk
- 1/2 cup (4 ounces) chocolate syrup
- 1 (7 ounce) can sweetened condensed milk
- 1/2 cup heavy cream
- 1/2 teaspoon pure vanilla extract
INSTRUCTIONS
- Whisk together the milk, chocolate syrup, and condensed milk, and refrigerate until chilled, at least one hour. In a separate mixing bowl, beat the heavy cream and vanilla until soft peaks just begin to form. Refrigerate until ready to use.
- Turn on ice cream maker. Pour the chocolate milk mixture into the already running bowl of the ice cream maker and freeze according to manufacturers instructions (about 15 – 20 minutes). Once the ice cream is thick, turn the maker off, remove the paddle, and fold in the chilled whipped cream until it is completely incorporated.
- Serve immediately, or transfer to a covered, freezer-safe container and freeze. (If freezing, let ice cream soften a few minutes before serving; you want it to be the consistency of a milkshake.)

Southern Fried Okra

Fried Okra! Oh where, oh where do I begin? This born & breed southern comfort dish dates back well before I was even born. And In My Family We Love Ourselves Some Fried Okra. But who wouldn’t love this Southern delicacy? Well to be totally honest I don’t to much care for okra unless it’s FRIED! Yep, that’s the only way I’ll eat it. Fried and seasoned to perfection. I can just taste it now. Yummy, Yummy, Yummy!
Ingredients
- 6 cups oil, for frying
- 1/2 cup cornmeal
- 1 cup all-purpose flour
- 2 pounds frozen or fresh okra, sliced 1/2-inch thick
- 1/2 cup buttermilk
- hot sauce
- salt, pepper, garlic powder, onion powder; to taste
Instructions
- Heat oil in a large, heavy-bottomed skillet or Dutch oven to 350 degrees F. (You may not need to use this much oil; do not fill the pan more than halfway up the sides with oil.)
- In a medium bowl, combine cornmeal, flour and seasonings. Set aside.
- In another bowl mix buttermilk and a couple dashes of hot sauce. Set aside.
- Dip okra in buttermilk mixture and then dredge in cornmeal-flour mixture to coat well.
- Carefully add okra to the hot oil and cook until golden brown. (It may be necessary to fry the okra in batches. They are prone to stick together.)
- Remove from oil, drain on paper towels. Lightly season with salt, pepper, garlic powder and garlic powder. Serve immediately.

Cheesy Hashbrown Casserole
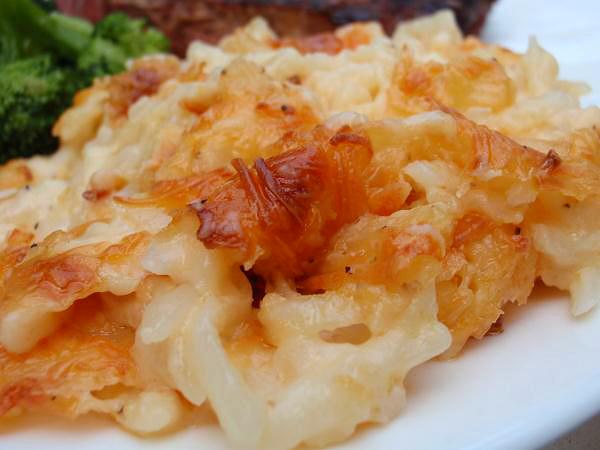
Potatoes. Potatoes. Potatoes. I’ll have them anyway I can get them. Yes! I love them just that much. Only problem is they love me just that much too. A straight killer to the hips and thighs. But what can I say, “Country Cookin’ Makes Ya Good Lookin'”. Yes Ma’am! So my question to you is: Are you looking for something downright sinful? Something comforting? Something that make you close your eyes and picture home? Well look no further cause this is it. Perfect for any breakfast, brunch, lunch or dinner table.
Psssst, Did I mention that it rivals the well known version @ Cracker Barrel. Well that’s what I heard but hey you haven’t heard that from me. LOL 🙂
Recipe & Photo is courtesy of Mama’s Southern Cooking
Ingredients
- 1 bag (2 pounds) frozen hash browns, thawed
- 1 can cream of chicken & mushroom soup
- 1/4 cup finely chopped onion
- 1/4 cup butter, melted
- 1/2 cup of sour cream
- 1/2 cup of milk
- 1 teaspoon salt
- 1/2 teaspoon garlic powder and onion powder
- 1/4 teaspoon pepper
- 3 cups of shredded Colby Jack Cheese
Instructions
- Preheat oven to 350 degrees F
- In a large bowl, combine the cream of chicken & mushroom soup, diced onions, melted butter, sour cream, milk, salt, pepper, onion powder, garlic powder and 2 cups of the shredded cheese. Mix well.
- Add the shredded cheese to the mixture. Mix well.
- Add the thawed hash browns to the mixture. Mix well.
- Pour into the prepared 9 x 13 inch baking dish.
- Sprinkle with the remaining 1 cup of shredded cheese.
- Bake uncovered for an 1 hour or until hot and bubbly and it begins to brown on top.
- Allow to sit for about 10 minutes before serving & Enjoy!
CHEF’S TIP: This cheesy hash brown casserole is a great recipe for you to BYOC (Be Your Own Chef). You can add bacon, ham or even hot dogs. Use different types of cheeses or even add some vegetables. Be creative and have fun with it!

Stuffed Chocolate Dipped Strawberries

Valentine’s Day is drawing near and I always get SUPER excited. You see in the Porter House Valentine’s Day for my husband & I is like Christmas for the kids. Yes! Valentine’s Day. A day filled with Love and Romance and Passion and Kisses and Candy and Flowers and Dinner and ok ok you already know. But even though the Porter’s are like that 365, 24/7 …. It’s just something about February the 14. It’s like EXTRA Special. A day designed for LOVE. I know by now you are like Tameca .. the strawberries ??? OK! enough rambling so I guess i’ll move on. Soooo just when you think chocolate covered strawberries were the belle of the ball, thebomb.com, the Pièce de résistance. BAM! The world is introduced to stuffed chocolate dipped strawberries. Talk about a Oh, My Goodness moment. I don’t know who came up with the concept but they got a sure winner with me. #WishingIHadSomeNow
Ingredients
- 12 strawberries
- 3/4 c milk chocolate chips (can use semi-sweet)
- 3 oz cream cheese
- 2 – 3 Tbsp powdered sugar
- 1/4 tsp almond extract
- chopped almonds, nuts, graham cracker crumbs (optional for garnish)
Instructions
- Rinse and halve strawberries lengthwise. Core out the center but leave the stem on. Dry on paper towels.
- Melt chocolate in microwave bowl until melted…stirring regularly.
- Line a cookie sheet with wax paper.
- Hold strawberry by the stem and dip in the chocolate, covering half of the strawberry. Place on the wax paper lined sheet.
- Beat together cream cheese, powdered sugar, and almond extract. Spoon into a pastry bag. Pipe into strawberries. Sprinkle the nuts or graham cracker crumbs on top for garnish (optional).
- Enjoy with your Sweetie & a glass of wine or champagne.

Mason Jar Breakfast Parfait

I love breakfast but there are times when I don’t feel the desire to whip out the pot & pan. Or when I simply crave something other than my usual “Green Smoothie”. This recipe is a great way to eat on the go & still be healthy. It also makes for a perfect snack.
Ingredients
- 1 cup low fat Greek yogurt
- 1/2 cup granola, any variety
- 1 cup washed & cut seasonal fruit (blueberries, strawberries, figs, peaches, raspberries).
- 1 TBSP honey
- 1 pint size mason jar w/ lid
- spoon
Instructions
In a mason jar add the yogurt and then fruit. Drizzle honey on top. Add granola last so it stays crisp. (Optional: Sprinkle parfait with a little cinnamon). Don’t forget to grab a spoon.

Mason Jar Salad
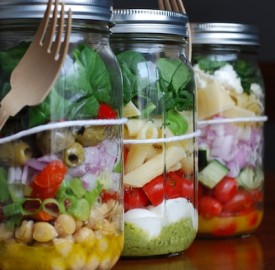
Delicious lunches can be just a few easy steps away. All it takes is a trip to the grocery store, a couple pantry staples, some mason jars, and an hour of your time.
Why mason jars, you might ask? Despite the obvious cuteness factor, these jars will keep your greens fresher than fresh, they won’t stain, they’re BPA free, microwave and dishwasher safe, perfectly sized for salads for one, won’t leak, travel well, and are reusable. Convinced? Yes, I thought so!
There really are only two rules to the mason jar salad: Start with the dressing or sauce, and end with the lettuce and herbs. However you want to layer the rest of the ingredients—try different meats, beans, lettuces, cheeses, vinaigrettes, or sauces—is up to you (though I usually layer by weight so heavier items, like tomatoes, are on the bottom).
The best part is you can make five salads at a time, and they’ll stay fresh for the whole week—just grab and go on your way out the door! When lunchtime rolls around, you’ll be sitting pretty with your delicious salad ready to be shaken up.
To get you going, check out three of my favorite recipes, ingredients listed in layering order. Happy lunching!

Caprese Pasta Salad
2 tbsp basil pesto (homemade or store-bought)
1 cup cherry tomatoes
1 ½ oz fresh mozzarella, chopped into bite sized pieces
2 oz cooked penne pasta
½ cup fresh spinach leaves
½ cup fresh basil, chopped

Chickpea Salad
2 tbsp easy lemon vinaigrette (see below)
1 cup chickpeas
½ cup sun-dried or oven roasted tomatoes
¼ cup spring onion, chopped
¼ cup red onion, chopped
½ cup olives, chopped
¼ cup piquillo peppers, chopped
½ cup fresh spinach

Greek Pasta Salad
2 tbsp easy lemon vinaigrette (see below)
1 cup cherry tomatoes
¼ cup red onion, chopped
1 cup cucumber, chopped
½ cup feta, crumbled
2 oz rigatoni, cooked
½ cup mixed greens
½ cup fresh mint, chopped
Easy Lemon Vinaigrette
(will make enough for 3-4 mason jars)
Juice from one large lemon
½ cup olive oil
Good pinch of salt
Couple of grinds of black pepper
Shake all ingredients together in a small container.
Speaking of shaking, try to remember to leave room at the top of each jar. Don’t worry if you get a little over zealous (I usually am!) with your ingredients though—just shake the jar like crazy when you’re ready for lunch, eat a few bites, then shake some more once there’s a bit more room!

Cabbage Soup

Ingredients
- ½ head of cabbage, chopped
- 1 cup celery, diced
- 1 cup white or yellow onion, diced
- 1 cup carrots, diced
- 1 green bell pepper, diced
- 2-3 cloves garlic, minced
- 4 cups chicken broth
- 14 oz can basil, oregano, garlic diced tomatoes
- 1 teaspoon oregano
- 1 teaspoon basil
- ½ teaspoon red pepper flakes
- few shakes of black pepper
- ½ teaspoon salt (optional)
Instructions
- Heat 2 tablespoons of olive oil in a large pot over medium heat.
- Add celery, onions, bell peppers, and carrots.
- Saute until slightly tender.
- Stir in garlic.
- Pour in chicken broth.
- Stir in tomatoes and cabbage.
- Bring to a boil and then reduce heat.
- Cook until cabbage is tender.
- Stir in oregano, basil, red pepper flakes, black pepper and salt (if using)
- Taste broth and adjust seasoning if needed.
- Serve and enjoy!
